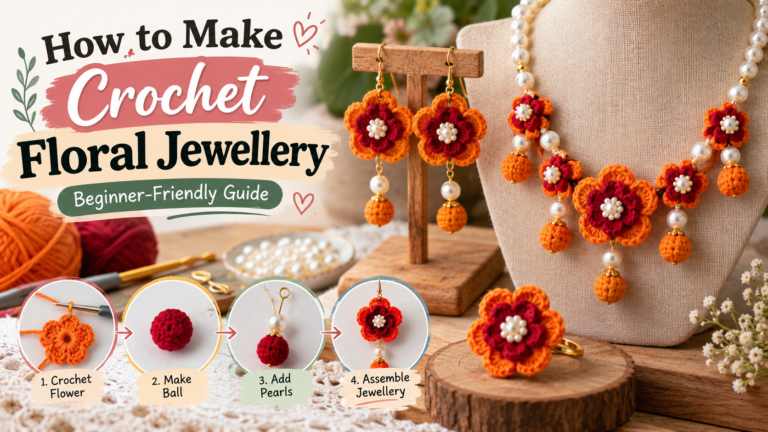
Crochet floral jewellery is wearable jewellery built from small crocheted flowers and balls, then finished with pearls and metal findings such as ear wires and jump rings. Earrings, necklaces and rings are the most common pieces. Each one starts as a tiny crochet shape and becomes jewellery once you add the hardware.
People make it for several reasons. It is a small project that uses very little yarn, and the results make thoughtful handmade gifts. Bold colours and pearls also suit festive outfits. This guide is inspired by The Pure Handmade's Handmade Crochet Flower Jewelry Set, but it is not the maker's original pattern. The stitch counts below are a proposed best-match reconstruction, written from studying the set's look and standard crochet techniques. They have not been tested, so treat them as a starting point and adjust as you go.
By the end, you will know what to buy, how to crochet two core pieces, and how to turn them into earrings, a necklace and a finger ring. You will also know the mistakes that most often spoil this kind of project.
What Is Crochet Floral Jewellery?
Crochet floral jewellery uses crocheted flowers, discs and balls as the decorative part of a piece, instead of metal or stones. Do not confuse it with jewellery made from real, pressed or resin flowers, which is a different craft. Here, every flower is made from yarn or thread.
Pieces You Can Make From the Same Flowers
A few simple shapes go a long way. A small stuffed ball can hang from an earring or sit in a necklace pendant. A shallow domed flower can sit on a ring base. In this guide, two crochet pieces make three accessories, so everything matches.
Yarn or Thread: Which Gives the Best Result?
Many tutorials use fine crochet thread and tiny hooks for delicate, lacy jewellery. Medium-weight yarn gives a bolder, chunkier look with a clearly raised texture. This guide uses the yarn version. A medium-weight yarn such as worsted or aran works well for it, in two contrasting colours. If you prefer a daintier look, switch to thread and a smaller hook, and expect to adjust every stitch count.
Materials, Tools and Jewellery Findings
Everything below is a suggestion for this reconstruction. It is not a confirmed list of what the original set uses.
Yarn, Hooks and Crochet Tools
- Medium-weight (worsted or aran) yarn in two colours. This guide uses orange and deep red.
- A 3.5 mm crochet hook (US E-4)
- At least two stitch markers
- A tapestry needle and sharp scissors
- A small amount of polyester fibre-fill
Popcorn stitches use a lot of yarn compared with plain stitches, so buy a little extra of each colour.
Jewellery-Making Supplies for Beginners
If you have never made jewellery, these are the tools and parts you need. Each does one simple job.
- Round-nose and flat-nose pliers: round-nose pliers shape wire loops, and flat-nose pliers grip and close jump rings.
- Flush cutters: these trim wire cleanly so no sharp end is left.
- Head pins: thin wire pins with a flat end, used to string beads into a dangle.
- Jump rings: small metal rings that connect pieces. A 5 mm size is a good start.
- Ear wires: the fish-hook wires that go through the ear.
- Pearls: round 6 mm beads for hoops and necklace strands, and a few small 3 to 4 mm ones for flower centres. The original set's bead material is not known, so choose glass or acrylic to suit your budget.
- Beading wire (about 0.45 mm), crimp beads and crimp covers: these hold the pearl strands together.
- Beading thread and a fine needle: for sewing pearls onto crochet.
- An adjustable necklace cord or chain and a ring base: ready-made parts you can buy.
For the earrings and necklace in this guide, expect to use roughly 65 to 70 of the 6 mm pearls, plus a few spares. This is an estimate, not a measured amount.
Stitches and Abbreviations You Will Use
This guide uses US crochet terms. If you learned UK terms, US single crochet (sc) is UK double crochet, US half double crochet (hdc) is UK half treble, and US double crochet (dc) is UK treble.
- ch: chain
- sl st: slip stitch
- sc: single crochet
- dc: double crochet
- inc: increase (2 sc in the same stitch)
- dec: decrease (sc2tog)
- MR: magic ring
- pc3: 3-dc popcorn
Basic Techniques Before You Start
How to Make a Crochet Flower Step by Step
Most beginner crochet flowers start from a magic ring. You work the first round of stitches into an adjustable loop, pull the tail to close the centre, then build the petals in rounds. A complete flower tutorial deserves its own guide, so this section stays short. If you would like to see more crochet flowers first, our crochet flower bouquet guide is a good place to start.
Magic Ring and Popcorn Stitch Basics
To make a magic ring, wrap the yarn into a loop, work your stitches into the loop and over the tail, then pull the tail to close the centre tightly. It leaves no hole, which matters for stuffed pieces.
A popcorn stitch is a small cluster that closes into a rounded bump. For a 3-dc popcorn (pc3), work 3 dc in the same stitch. Take the hook out of the loop, insert it from front to back into the top of the first dc, pick the dropped loop back up and pull it through. The bumps look best when you keep every dc the same height and pull the loop through firmly.
How to Make Crochet Floral Jewellery Step by Step
Here is the full sequence in short before the detail:
Every count below is a proposed reconstruction. Use the first ball as a test of your tension, and change the hook size if it comes out too large or too loose.
Step 1: Crochet a Test Popcorn Ball
The popcorn ball is the core piece. You need two small balls (S) in two colours for the earrings, and for the necklace two small balls plus one medium ball (M). Use a 3.5 mm hook and work in a continuous spiral, marking the first stitch of each round.
| Round | Small ball (S) | Medium ball (M) |
|---|---|---|
| 1 | 6 sc in MR (6) | 6 sc in MR (6) |
| 2 | inc in every st (12) | inc in every st (12) |
| 3 | [sc, inc] ×6 (18) | [sc, inc] ×6 (18) |
| 4 | [pc3, sc] ×9 (18) | [sc in next 2 sts, inc] ×6 (24) |
| 5 | [sc, pc3] ×9 (18) | [pc3, sc] ×12 (24) |
| 6 | [sc, dec] ×6 (12) | [sc, pc3] ×12 (24) |
| 7 | dec ×6 (6) | [sc in next 2 sts, dec] ×6 (18) |
| 8 | n/a | [sc, dec] ×6 (12) |
| 9 | n/a | dec ×6 (6) |
For the two-colour earring balls, work rounds 1 to 3 in red and change to orange at the start of round 4. To change colour cleanly, work the last stitch of the old colour until two loops remain on the hook, then finish it with the new colour.
When six stitches remain, stuff the ball in small pieces. Then cut the yarn, leaving a 25 cm tail, thread it through the front loop of each remaining stitch, pull tight and knot.
Checkpoint: the ball should measure roughly 3 cm across and look round, not egg-shaped. If stuffing shows through, go down 0.5 mm in hook size. If it is too large or floppy, go down a size too.
Step 2: Make the Domed Disc Flower
This shallow stuffed flower becomes the ring. Use the 3.5 mm hook and work in a spiral.
| Round | Colour | Instructions |
|---|---|---|
| 1 | Red | 6 sc in MR (6) |
| 2 | Red | inc in every st (12) |
| 3 | Orange | [sc, inc] ×6 (18) |
| 4 | Orange | [pc3, sc] ×9 (18) |
| 5 | Orange | sc in each st, working into the top of each popcorn (18) |
| 6 | Orange | [sc, dec] ×6 (12). Stuff lightly. |
| 7 | Orange | dec ×6 (6). Close as in Step 1. |
Checkpoint: the red centre should sit on the face of the dome, ringed by orange bumps. The closed end becomes the back.
Step 3: Sew On Pearls and Make Dangles
To sew a pearl onto crochet, knot doubled beading thread and come up from the back. Pass through the pearl, then go back down through the same stitch and a neighbouring one. Repeat two or three times before knotting at the back.
To make a head-pin dangle, string your beads onto a head pin, leaving about 10 mm of wire. Bend it 90 degrees and make a wrapped loop with round-nose pliers. Thread the loop onto its jump ring or part before you close the wraps.
Always open and close jump rings sideways with two pliers, never by pulling the ends apart. That keeps the ring round and the join tight.
Step 4: Assemble the Earrings
- Make the pearl hoop. Cut about 25 cm of beading wire. Thread on a crimp bead, an open jump ring, 8 pearls, a second open jump ring and 8 more pearls. Pass the wire back through the crimp bead so the pearls form a ring about 3.5 cm across. Pull snug, crimp, trim and cover the crimp. Close both jump rings.
- Add the ear wire. Open the loop of an ear wire sideways, slip it through the first jump ring and close it.
- Add the ball dangle. On a head pin, string a crystal or pearl bead and a small bead cap. Push the pin up through an earring ball from the red end and out of the orange top. Trim to 10 mm and make a wrapped loop, threading it onto the second jump ring before you close the wraps.
- Make the second earring the same way.
Checkpoint: both earrings should hang straight, match in height and feel light. If they are heavy, make smaller balls and stuff them more lightly.
Step 5: Assemble the Necklace
- Arrange the three balls in a triangle, with the medium red ball at the bottom centre and a small orange ball at each upper side. Sew them together with several stitches at each contact point.
- Make a head-pin dangle with a bead and a cap. Push it through the bottom of the red ball and out of the top, then make a wrapped loop.
- For each pearl strand, cut about 20 cm of beading wire. String a crimp bead, a small jump ring, about 16 pearls, a second crimp bead and a cone end cap. Crimp both ends. Each strand comes out at roughly 9.5 cm.
- Sew a small loop of yarn into the top of each side ball and join each strand's jump ring to it.
- Attach a ready-made adjustable cord or chain to the end caps.
The cord is my assumption. The original set's back fastening is not known, so choose whichever fastening you prefer.
Step 6: Make the Finger Ring
Make one domed disc flower and stuff it lightly. Sew a cluster of five small pearls over the red centre. Wrap an adjustable ring base tightly with one layer of red yarn, tie off on the inside and secure the knot with a dab of jewellery glue. Sew the dome to the ring pad 6 to 8 times, until it sits firmly and does not rock.
Checkpoint: run a finger over the inside of the band to confirm that no knot or wire end can touch the skin.
Tips, Safety and Common Mistakes
Tension, Stuffing and Weight
Crochet firmly. Dense stitches stop stuffing from showing and keep the bumps crisp. Stuff in small pieces, and keep earring balls small and lightly filled so they stay comfortable to wear.
Common Mistakes and Quick Fixes
| Problem | Likely cause | Fix |
|---|---|---|
| Popcorns flop open or look uneven | Dropped loop not pulled through firmly, or dc of different heights | Pull the loop through snugly and keep every dc the same height |
| Ball is egg-shaped | Wrong round counts | Recount each round against the table |
| Stuffing shows | Hook too large or tension loose | Drop the hook by 0.5 mm and stuff in small pieces |
| Pearls fall off | Single thin thread or weak knots | Use doubled beading thread and knot twice |
| Earrings feel heavy | Balls too large or stuffed too firmly | Make smaller balls and stuff lightly |
| Wire ends poke out | Wire left too long | Trim flush, tuck ends in and cover crimps |
Make It Safe to Wear
Trim every wire end flush and cover each crimp. Tug-test every bead, ring and cord before wearing. Keep sharp findings and small parts away from young children. Handmade pieces also vary slightly from one to the next, so check each piece before you wear or gift it.
Frequently Asked Questions
Which flower is easiest to crochet for jewellery?
A simple five-petal or daisy-style flower worked in the round from a magic ring is a good starting point. It has few steps, so it is easy to repeat identically.
Can I use yarn instead of thread for crochet jewelry?
Yes. Medium-weight yarn gives bolder, chunkier pieces, as in this guide. Thread gives a finer, lacier look and needs a much smaller hook. Keep pieces small whichever you choose, so earrings stay light.
How do I stop pearls and beads from falling off crochet?
Sew them on with doubled beading thread, pass through the same stitches more than once and knot twice at the back. Tug-test each bead before you finish.
Do I need special tools to make crochet floral jewellery?
You need only a few: round-nose and flat-nose pliers, flush cutters and a fine needle. They cost little, and they are the same tools used for basic beaded jewellery.
Conclusion
Crochet floral jewellery comes down to two shapes and a few findings. Make a test popcorn ball, then a domed flower, and use them to build earrings, a necklace and a ring that match. Keep stitches firm, stuff lightly, secure every bead and check every wire end. Because the counts here are an untested reconstruction, make one ball before you commit to a full set, and adjust the hook size to suit your yarn.